Note: the following lesson is written in a manner to help provide understanding to a general user. This is neither a scientific nor technical document. More scientifically detailed understanding can be found in the following papers:
Looking beyond fibrillar features to scale gecko‐like adhesion
MD Bartlett, AB Croll, DR King, BM Paret, DJ Irschick, AJ Crosby
Advanced Materials 24 (8), 1078-1083
High capacity, easy release adhesives from renewable materials
MD Bartlett, AJ Crosby
Advanced materials 26 (21), 3405-3409
Designing Bio‐Inspired Adhesives for Shear Loading: From Simple Structures to Complex Patterns
MD Bartlett, AB Croll, AJ Crosby
Advanced Functional Materials 22 (23), 4985-4992
Scaling normal adhesion force capacity with a generalized parameter
MD Bartlett, AJ Crosby
Langmuir 29 (35), 11022-11027
Lesson #1: Basics of using the tendon in a Geckskin® device (download here)
Quick summary
The gecko tendon – a stiff material connecting a gecko toes’ skin with its skeleton – is unique to the gecko’s anatomy
The gecko’s tendon is a factor in the bio-inspiration behind the Geckskin technology
Understanding its role in a Geckskin device helps us understand the technology
With that understanding we have better insight into creating Geckskin new solutions
At Felsuma we use the Tendon in different device configurations depending on the application and problem to be solved
Introduction
The Geckskin technology is bio-inspired** by the gecko. The gecko has a different anatomical structure from any other animal on the planet. It has a stiff tendon connecting the skin of its toes with the bones in its skeletal structure. Understanding the role of the tendon was an important insight when our scientific founders (Sci Fos), professors at the University of Massachusetts Amherst, invented the Geckskin technology##. Now, understanding how to use it to your advantage is one of the most important concepts in what it means to Think Like Geckskin®.
## Many people point to the setae, the tiny hairs on the gecko’s toes as the basis of their adhesion-based performance, but setae are not unique to geckos - spiders and other animals also have them. While setae play a role in the efficient locomotion of a gecko, it is the tendon structure connecting skin to bone unique to the gecko that enables its scale-able grip and peel performance. Additionally, there are a number of organisms that have smooth pad feet and still exhibit reversible adhesion-based locomotion.
This lesson will walk you through a few introductory tendon configurations so that you can begin to understand its role, value and unique qualities. THEN you’ll be one giant step towards building your Geckskin solution.
To start, check out the following comparison of a gecko’s anatomy with that of the Griphook (one of the products you’ll find on our website):
Diagram 1

Take note of the shared bio-inspired** names of anatomical parts between the animal and the device. The Pad in a Geckskin device is inspired by the toes of the gecko that contain millions of tiny hairs called setae. Other university-based gecko-like technologies seek to mimic those hairs using nano- or microstructures. To prove to themselves that their bio-inspired systemic, anatomical structure could be the key to a gecko’s mobility, our scientific founders conducted experiments to prove that the entire systemic solution in a Geckskin device is stronger than relying solely on those microstructures. Said another way, the gecko does not rely solely on the setae to climb; the setae are necessary but not sufficient. The hairs’ role is to create a bond with the surface. That is the case with our Pad; its role is to create the bond with the surface. The Skin on the other side of the Pad is what the hairs are integrated into in a gecko’s foot. That Skin is, in turn, integrated into a stiff Tendon that is then connected to a Bone in the animal’s skeletal structure. This integrated system is what gives the gecko its unique ability to climb vertical surfaces and is the bio-inspiration for the Geckskin technology.
Bio-inspiration versus bio-mimicry. Rigorously speaking, I don’t know if there’s a fine line between the two - I’m not an expert. But allow me to offer the following examples to illustrate the difference. If you make a fish robot that can swim and its tail will replicate the real fish tail movement, back and forth, that’s more bio-mimicry; they’re mimicking the fish. Our Sci Fos started by figuring out the underlying physics, engineering, and biological mechanisms that allow both very small and very large geckos to climb via adhesion. So they started with mathematical assumptions inspired by the gecko’s anatomy and proceeded to invent the Geckskin technology. They did not replicate the gecko; they were inspired by it. There are other really cool gecko-like technologies that are more bio-mimetic. They actually have nano or micro structures on them to mimic the hairs on a gecko’s toe. I hope that helps.
But let’s back up for a minute. Many, many people have seen and contacted us about the many videos broadcast in cable science shows (e.g. Nat Geo, Discovery Channel, Stephen Hawking’s Brave New World and more) demonstrating a Geckskin device holding or pulling large weights.
Picture A

Geckskin device ~6” x 8” holding 300 lbs.
Picture A above from one of those videos taken in Professor Crosby’s lab at the University of Massachusetts Amherst. It shows a Geckskin device ~6” x 8” holding 300 lbs. People write to ask, “may I have that tape?” Let me explain a bit what’s going on there. We’ll start with: it’s not tape. It’s a Geckskin device, believe it or not, with the same (Pad, Skin, Tendon, Bone) anatomy as shown in Diagram 1.
WHAT? What’s that you say??!!
That device from Professor Crosby’s lab has all of the same anatomical components as the device in Figure 1 but those components are constructed slightly differently for this specific application.
With that as an introduction, here we go. Ready?
Let’s start with that device in the UMass Lab. Below, Diagram 2 is a layer by layer cartoon of the device from Professor Crosby’s lab holding all that weight.

What’s important for you to note is:
It has the same anatomical parts as Diagram 1 but the Tendon is now connected to the end of the Skin (different from Diagram #1 where the Tendon is connected to the middle of the Skin), to distribute the load for this application##
By design of the experiment and demonstration, parts of the Geckskin device (the Tendon and Bone) fall below the bottom of the glass
Therefore, the Geckskin device is being pulled straight down, in pure shear
## Quiz: Which device in the Felsuma portfolio on our website has the same construct as the cartoon above? Answer: The Griphanger™
The second bullet above is very important. It’s noting that the Geckskin device is not on a surface that extends to the floor (like a wall). In Diagram 2, the surface on which the Geckskin device is hanging ends so that the weight is directly below the Geckskin device. The Geckskin device is being pulled straight down; it is in pure shear (there is no normal force acting on the device - normal force is the force pulling away from the wall). In one of the videos on TV, the Sci Fos show a Geckskin device pulling a car. In that scenario once again the surface ends (the hood of the car) permitting the Geckskin device to be in pure shear. When a Geckskin device with this construct (Tendon connected to the end of the Skin) is put on a normal wall with an object hanging from it, we don’t have peel control; it will slowly peel over time because the object will not be in pure shear.
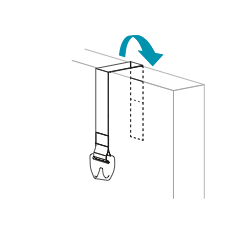
Diagram #3 offers a cartoon of what happens using the same device but now applied to a vertical surface (a wall) that extends to the ground.

Above in Diagram #3, the attached weight is pulling the device away from the wall. Over time, the Geckskin device with this anatomical configuration will peel off the wall. The object is pulling the Geckskin device away from (that’s normal force) the wall. You’ve seen it with scotch tape rolled into a circle to hold up a holiday card The holiday card is not in pure shear; it’s pulling away from the wall so that over time, the tape peels off. Since the object is resting against the wall, the Geckskin device has normal force acting upon it - the Geckskin device with this construct will slowly peel off the wall.
Here’s a real life demonstration. Picture A1 below shows a Griphanger holding a toy on a wall. The Griphanger has the same anatomical structure as the device the Sci Fos used in the lab in Picture A. But now we’re using it on a vertical surface that extends to the floor.

But the Griphanger is not designed to be used in this fashion; it’s designed to be used over corners. To demonstrate why, see Picture A2 below. Picture A2 is a close up of the Pad from Picture A1. You’ll notice it is peeling off of the wall due to the normal force acting upon the Geckskin device from the toy’s bulk. Since this is not the correct application of this device’s Tendon configuration, we do not have peel control.

Before we try to solve the question of how to reconfigure the anatomy of that device to hold an object on a wall, let’s talk about how we can use this current construct to our advantage. See Diagram #4 and below that Diagram, 4A the cartoon from the Griphanger instructions. The Griphanger has the same anatomy as the above device in Diagrams #2 and #3 BUT we take advantage of that anatomy by putting the Griphanger over a door (you can also use it over the edge of a table). By putting the device over a corner, we’re creating a scenario where the Pad is of the Geckskin device in pure shear. We have re-established peel control.

Note in Diagram #4, that the object creates a substantial amount of normal force on the Tendon. Because the Pad is in pure shear on the other side of the door, that normal force acting on the Tendon does not affect a peel. We used this construct of Pad, Skin, Tendon and Bone as intended so that the Pad has pure shear force acting on it thereby establishing peel control. Now the amount of normal force acting on the Tendon will not affect a peel of the Pad.
Diagram 4A: Griphanger Instruction Diagram
So now the question remains: how can we hold weight on a wall and maintain peel control?
Return to Diagram #1 at the top of this lesson that shows the Griphook. The difference between the Griphanger and the Griphook is that the Griphook has the Tendon attached to the middle of the Skin and the Griphanger has the Tendon attached to the edge of the Skin. See Diagram #5 below illustrating that the Tendon is attached to the middle of the Skin.
Because the Tendon is in the middle of the Skin on a Griphook we are distributing the force of the load across the entire device. The bottom of the Skin does not have an outward force (normal force) pulling it out. By not creating a peel force at the bottom of the Skin, we have peel control.

As you can see on the Griphook and in Diagram #5, the Tendon, shown in grey, is secured to the Skin above where it angles out to attach to the Bone. This device is specifically designed to hold an object on a wall, in shear at <10° angle from the Skin. We designed this device so that as long as the load is < 1 lb.^^ and the Tendon remains within 10° of the Skin, we have peel control.
^^ In a separate lesson we’ll talk about how to increase load capacity using larger devices, more devices and different materials
What happens after 10°, when the Tendon is more than 10° from the wall? The normal force pulling on the device may force the peel of the entire device off of the wall.
This is a subtle point when one wants to understand the load capacity of a Geckskin device. People ask us, “how much weight will it hold?” Because there’s a difference between normal and shear forces, we have to ask in return: what are the dimensions of the object our device will hold for your application? By knowing the object’s dimensions we have some idea of the normal and shear forces the object is going to exert on the Geckskin device. We need to understand the direction of the forces acting upon the Geckskin device to design the device to neutralize those forces and maintain peel control.
Therefore, for the Griphook, we say the load capacity is 1 lb. That assumes not only that the object will be <1 lb. but also that it will move the Tendon no more than 10° from the Skin - that there will be substantially more shear force than normal force.
NOW you may ask, Is it possible to make a device that can withstand >10° angle from the skin? Yes. Check this out.

Here we’ve attached the Tendon on both sides where it meets the Skin, thereby permitting nearly 180° of Tendon utility. But it gets better. Once we’ve attached the Tendon in this way, we can use it to hang an object from a horizontal surface. If we place this device on the underside of a horizontal surface it is now holding an object “normally” - the entire force acting on the Geckskin device is normal force.

According to the Sci Fos’ lab tests, the same device holding an object in shear versus normal will have a four to one load-bearing capacity, respectively. So the device that can hold say, 1 lb. in shear will hold 0.25 lb. normally.
In conclusion, it is the tendon connecting skin (of the toe) to bone (skeletal structure) in the gecko that is unique to that animal. But it’s the entire systemic structure of pad, skin, tendon and bone that we require to support weight. We have learned how to manipulate the structural system to manage forces in shear and normally. Understanding how to harness the power of the Tendon is the key to using the Geckskin technology to create new devices and solutions when weight is involved.
Here endeth the lesson on Tendons.
Please write to us, info@buygeckskin.com, and tell us what is not clear about the above. This is the first time we’ve drafted a document of this nature so we don’t know if we’ve explained it well unless you tell us. We’re up to our eyeballs in this stuff everyday so we require your feedback if we’ve explained something poorly.
Please also tell us other lessons that would be helpful to you.